QR Code Design Rules: 10 Rules for Beautiful Codes That Still Scan
The QR code design rules that decide whether a styled code scans: contrast, minimum size in cm, quiet zone, finder patterns, logo size, error correction, data length, colors, distortion, export format, and testing.


QR Code Design Rules: 10 Rules for Beautiful Codes That Still Scan
A QR code scans when the scanner can find it and separate dark from light. Almost every design rule follows from that: dark modules on a light background (4.5:1 contrast or more), at least 2 cm wide, four modules of quiet zone, intact finder patterns, a logo under about 20–25% of the area, and tests on real phones before you print. Inside those limits, you can change colors, shapes, frames, and logos freely.
You know what's worse than an ugly QR code? A beautiful QR code that doesn't work.
I've seen this play out so many times. Someone spends hours getting their QR code to look perfect, matches their brand colors perfectly, gets it printed on fancy cardstock, and then... nobody can scan it. The design was great. The functionality? Not so much.
Here are the rules I follow to keep QR codes both good-looking and usable.
QR code design rules at a glance
| # | Rule | Minimum or target |
|---|---|---|
| 1 | Contrast | Dark modules on light background, 4.5:1 or higher (7:1 is better) |
| 2 | Size | 2 cm wide in print; scan distance ÷ 10; 200 px on screens |
| 3 | Quiet zone | 4 modules of empty margin on every side |
| 4 | Finder patterns | Keep the three corner squares intact and uncovered |
| 5 | Logo | About 20–25% of the area, centered, with a clear border |
| 6 | Error correction | M for plain codes, H with a logo or custom shape |
| 7 | Data length | Keep the content short so the modules stay large |
| 8 | Colors and gradients | Solid colors; no light ends of a gradient; test inverted codes |
| 9 | Distortion | Keep the code square; no stretching, warping, or tight curves |
| 10 | Testing | Several phones, several lights, the real printed piece |
Rule 1: Why is contrast non-negotiable for scannable QR codes?
This is where most people trip up. You can't just pick any two colors that look nice together and expect a phone camera to read them.
I once helped a friend with QR codes for their wedding invitations. They wanted light pink on cream because it matched the aesthetic. Looked gorgeous. Scanned approximately never. We ended up going with a darker rose color that still fit the vibe but actually had enough contrast to work.
Phone cameras need clear visual separation between the QR code modules and the background. If you squint at your design and the pattern doesn't pop out clearly, it won't scan reliably. Some phones might get it in perfect lighting, but you want it to work for everyone, including that person scanning with an older Android in a dimly lit room.
The WCAG contrast ratio guidelines (4.5:1 minimum) are a good starting point, but honestly? Higher is better. Aim for 7:1 if you can. Use an online contrast checker. They're free and will save you from a lot of headaches.
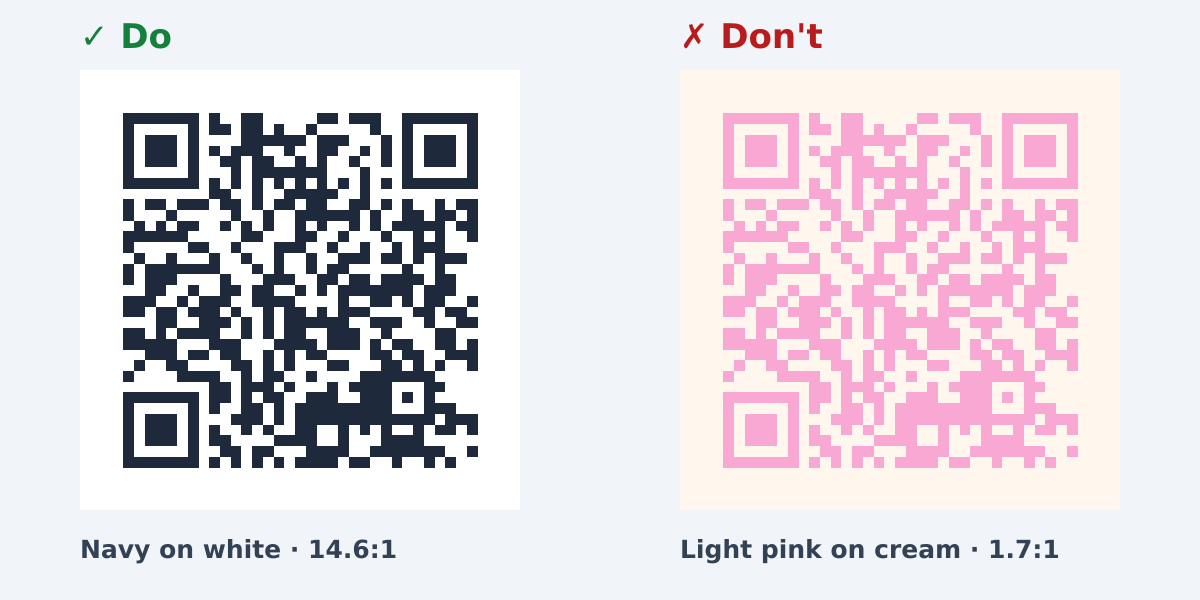
We ran both codes through a QR decoder. The navy code decoded at full size and at 40% size. The light pink code did not decode at either size. Our QR code colors guide has a table of which colors pass and which fail, with measured ratios.
Rule 2: How big should my QR code be (for real-world scanning)?
The second most common mistake is making QR codes too small. I get it. You want to fit more content on your flyer or business card. But if people can't scan your QR code, what's the point of having it there?
For anything printed, 2 cm × 2 cm is the absolute minimum. I usually go bigger because "technically scannable" isn't the same as "easily scannable." Business cards can get away with 1.5 cm if you're really tight on space, but that's pushing it.
The rough guideline: for every meter of scanning distance, you need about 10 cm of QR code width. A poster that people scan from 2 m away needs a code of about 20 cm. I've seen event posters with tiny QR codes at the bottom and wondered who they thought was going to scan those.
| Where | Scan distance | Minimum width |
|---|---|---|
| Business card | 15–20 cm | 2 cm |
| Flyer, menu, table tent | 25–30 cm | 2.5–3 cm |
| Poster | 1 m | 10 cm |
| Shop window or banner | 2–3 m | 20–30 cm |
For screens, don't go below 200 × 200 pixels. More is better. Remember that people are usually holding their phones at arm's length when scanning.
Rule 3: Why do I need a quiet zone (white border) around my QR code?
The empty space around your QR code (the "quiet zone") isn't just for aesthetics. It's how scanning software figures out where your code begins and ends.
You need at least four modules worth of space (a module is one of those small squares that make up the QR code) on all four sides. And it needs to be the same color as your background, or at least a solid color that doesn't interfere.
I see people put text right up against their QR codes all the time. Or they crop them too tightly to save space. Or they put them on busy backgrounds. All of these things make scanning harder or impossible.
When in doubt, give it more breathing room. Your QR code will scan faster and more reliably, which is what actually matters.
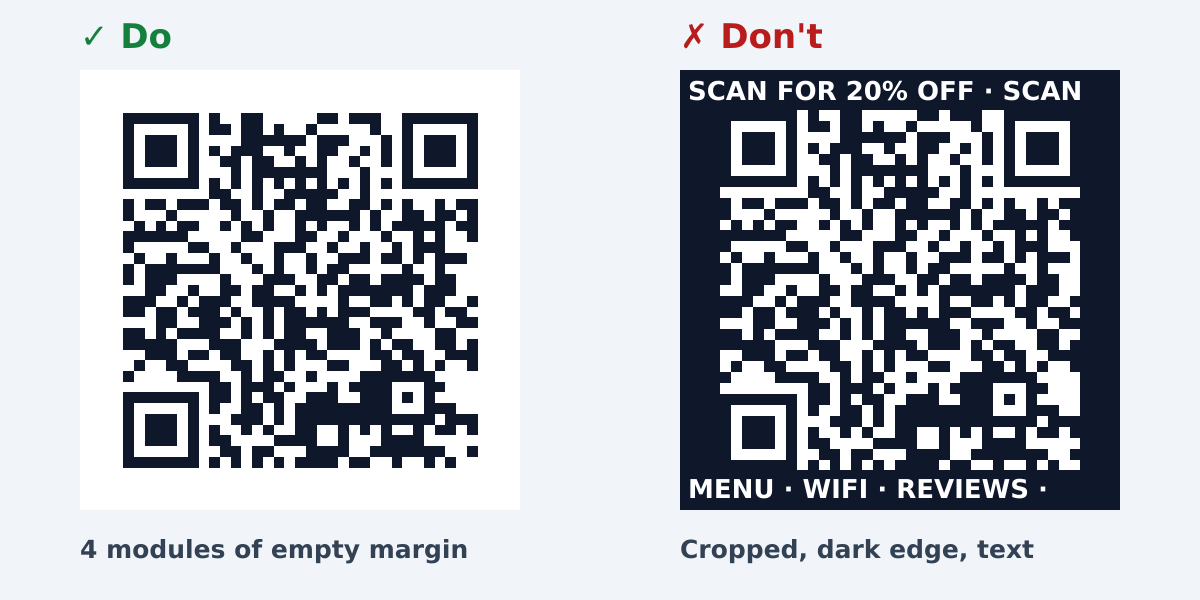
The cropped code on the right has the same pattern, but our decoder could not find its edges and did not read it.
Rule 4: Can I change the three corner squares (finder patterns)?
The three big squares in the corners are finder patterns. Each one is a dark square inside a light ring inside a dark square. Scanners look for that ring structure first, and use it to find the code's position, size, and rotation.
You can style them. Rounded corners, circles, and dotted eyes usually scan fine, and Pretty QR has several eye shapes in the Styling tab. What breaks scanning:
- Covering a finder pattern with a logo, a sticker, or text
- Filling in the light ring between the outer and inner square
- Merging the finder pattern into nearby modules or a frame
- Using a different color for the eyes that is lighter than the rest of the code
If you change the eye shape, test it the same way you test a new color.
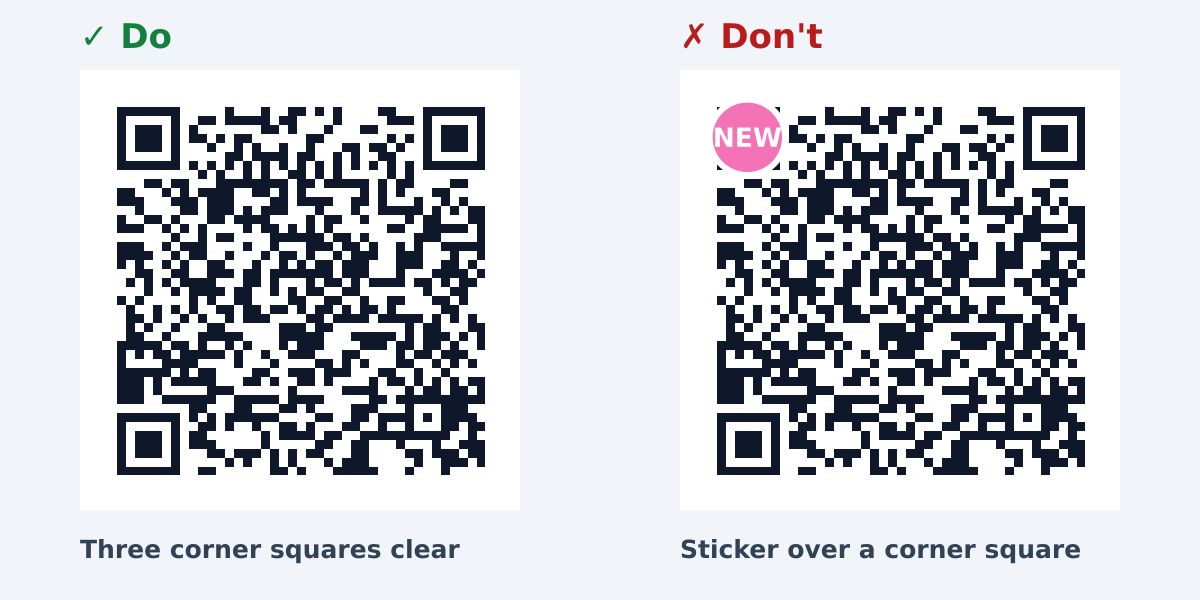
Both codes use the highest error correction level (H). One sticker over one corner square was still enough to stop our decoder from reading the code.
Rule 5: How do I add a logo without breaking my QR code?
Logos in QR codes look professional and help with branding. But they're also where people get overly ambitious and break things.
QR codes have error correction built in. At the highest level they can lose about 30% of their data and still work. That's what lets you put a logo in the center. But that 30% is a maximum, not a target. I usually keep logos to about 20–25% of the total area, just to have some margin for error.
Also, logo placement matters. Center is safest, because it keeps the logo away from the finder patterns in the corners. And make sure there's some visual separation: a white border around your logo helps it not interfere with the QR code pattern underneath.
I've seen people try to integrate their logo in creative ways, like having it blend into the QR code modules or placing multiple small logos around the edges. Creative? Sure. Reliable? Not really. Stick with the center, keep it reasonably sized, and you'll be fine. The step-by-step version is in how to add your logo to a QR code.
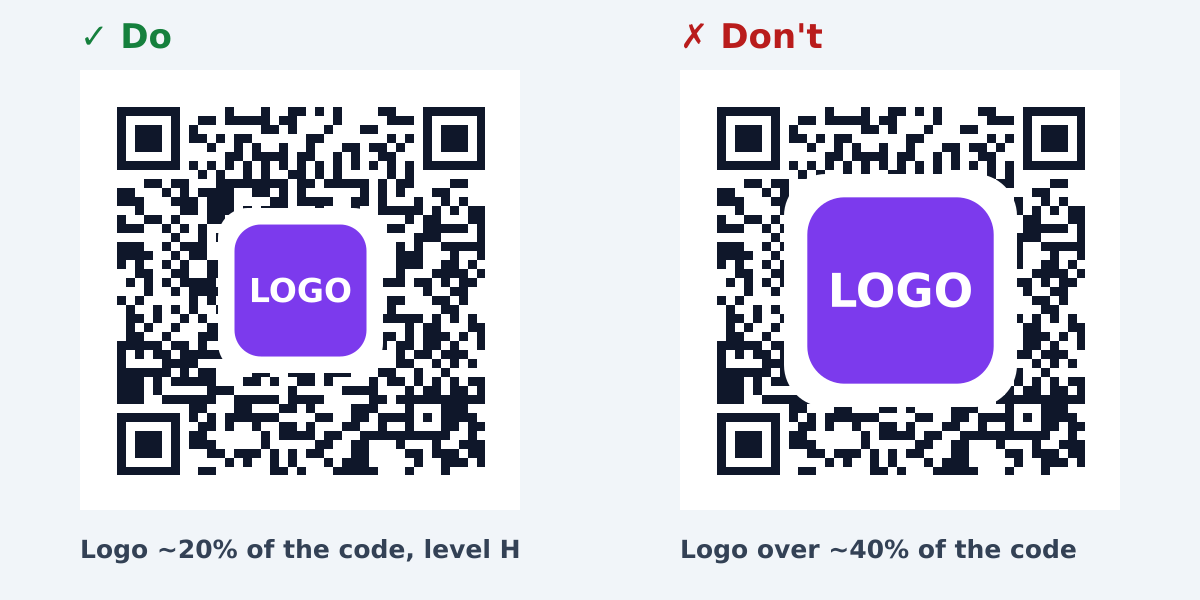
Both codes use error correction level H. The 20% logo decoded at full size and at 40% size. The 40% logo did not decode.
Rule 6: Which error correction level should I use?
QR codes have four error correction levels. A higher level recovers from more damage, but it adds modules, so the same content makes a denser code.
| Level | Recovers about | Use it for |
|---|---|---|
| L | 7% | Clean digital screens with very long content |
| M | 15% | Plain printed codes (a good default) |
| Q | 25% | Codes on packaging or surfaces that can get dirty |
| H | 30% | Codes with a logo, a custom shape, or rough surfaces |
Pretty QR uses level M by default and switches to level H automatically when you add a logo, so you do not need to set it yourself.
Rule 7: Why should I keep the content short?
Every extra character adds modules. The smallest QR code (version 1) is 21 × 21 modules, and each version adds 4 modules per side, up to 177 × 177. When you print a dense code at the same width, each module gets smaller, and small modules are harder to scan and less tolerant of style changes.
Practical ways to keep codes simple:
- Use your shortest real URL. Remove tracking parameters you don't need.
- For a long message or a long contact card, check whether the code still scans at the size you plan to print.
- If the code looks very dense, print it larger.
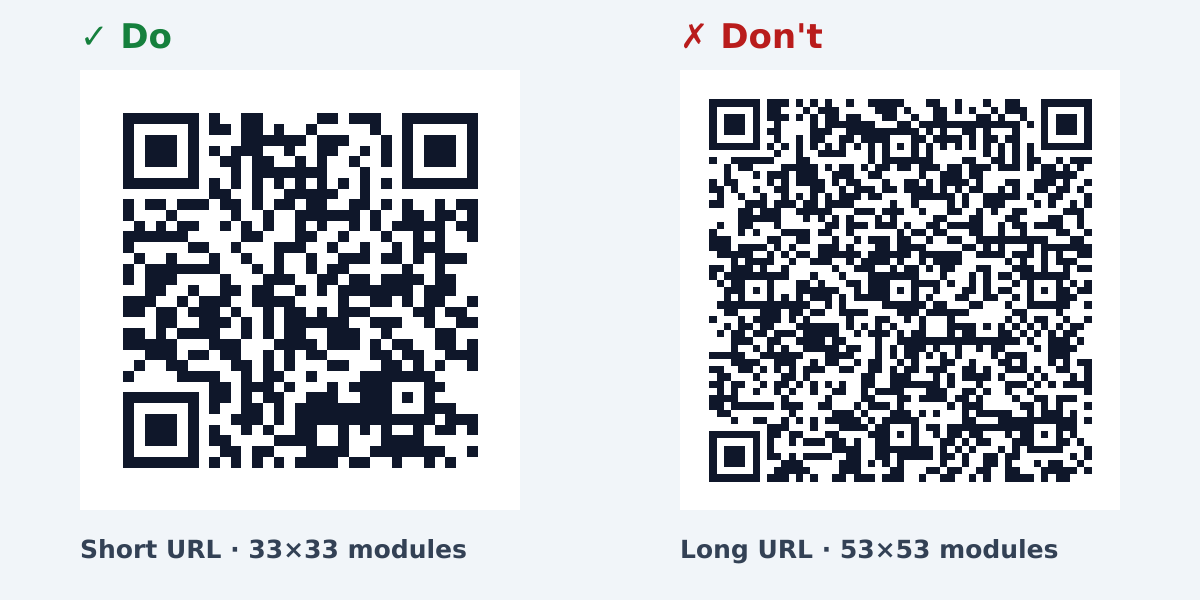
Both codes decoded in our digital test. At the same printed width, the long URL's modules are about a third smaller, so the code needs better light, a steadier hand, or a larger print to scan as easily.
Rule 8: What about colors, gradients, and inverted codes?
Solid colors are safer than gradients. With a gradient, the light end often loses contrast, and different phones expose the colors differently. If you use a gradient, check that its lightest part still passes the contrast test.
Light modules on a dark background (an inverted code) are allowed by the QR standard, and most current phone camera apps read them. Some older scanner apps don't. If you can't test the devices your audience uses, keep the modules dark.
And think about colorblind users. Red-green combinations are particularly problematic. When possible, use colors that differ in brightness, not just hue.
Rule 9: Why must a QR code stay square?
The grid only works if the modules stay in a regular square pattern. Don't stretch a code to fill a wide space, don't warp it to follow a design, and be careful with tight curves, such as a small bottle or a cup. Rounded modules and dots are fine because the grid stays regular. The more you deviate from standard squares, the more you need to test.
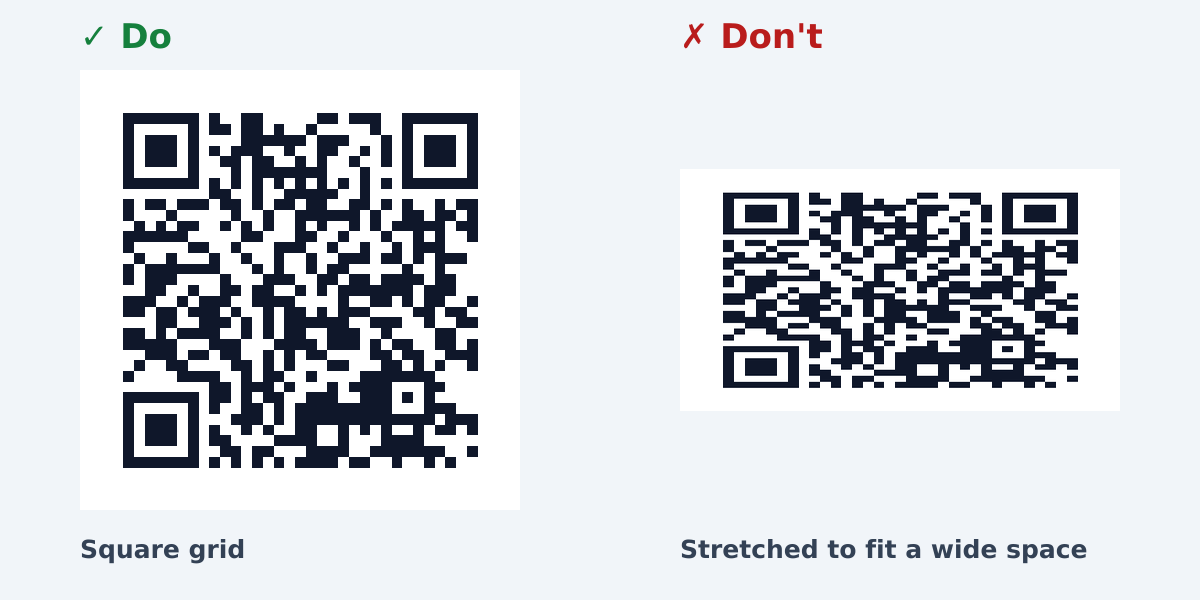
The stretched code still decoded in our digital test, because decoders can correct even stretching. Real distortion is rarely that even: a curved bottle, a perspective angle, and a stretch together are where scans fail. Keep the code square and remove one problem from the list.
Rule 10: How should I test my QR code on real devices before launch?
This is the step people skip, and it's the most important one.
You can't just test on your own new phone and call it done. Try it on an older Android phone. Try it on someone's phone with a cracked camera lens. Try it in different lighting: bright sunlight, dim indoor lighting, fluorescent office lights.
If you're printing the QR code, test the actual printed version. I've had QR codes that looked perfect on screen but didn't scan well when printed because the printer introduced subtle color shifts that reduced contrast. For print, export as SVG, so the code stays sharp at any size. PNG is fine for screens.
Things that should make you worry during testing: if it takes more than a couple seconds to scan, if you need multiple attempts, if you have to hold your phone at a weird angle, if it only works in good lighting. These are all signs that something needs adjustment.
Try the built-in camera app and also try dedicated QR scanner apps. Some apps are more forgiving than others, but you want it to work with the native camera since that's what most people will use.
What should I check first when my QR code won’t scan?
If your QR code won't scan, here's the usual culprits:
Won't focus or won't detect? Probably too small. Make it bigger.
Takes forever to scan? Contrast issue. Increase the difference between your foreground and background colors.
Only works at certain angles or in perfect lighting? Check your quiet zone. Make sure there's enough margin around the code.
Scans inconsistently? If you have a logo, it might be too large or covering critical parts of the code. Try making it smaller. Also check that nothing covers the three finder patterns.
Looks very dense? Shorten the content or print the code larger.
The takeaway
Design matters. Aesthetics matter. But functionality comes first, always.
Start with a QR code that scans perfectly every time. Then style it up while continuously testing to make sure it still works. Don't do it the other way around. It's way harder to fix scanning issues after you've committed to a design.
And please, actually test your QR codes before you print 10,000 copies of them. Your future self will thank you.
For styled examples that follow these rules, see 20 cute QR codes that still scan. Or try designing one yourself and see how real-time preview makes testing so much easier.
Frequently asked questions
What are the most important QR code design rules?
Keep dark modules on a light background with a contrast ratio of at least 4.5:1, print the code at least 2 cm wide (scan distance ÷ 10), leave a quiet zone of four modules on every side, keep the three corner finder patterns intact, keep a logo under about 20–25% of the area, and test on several phones before you print.
Why does contrast matter so much for QR code scanning?
Phone cameras need a clear visual gap between the dark modules and the light background. If you squint and the pattern does not pop, many devices will struggle, especially in poor light. Strong contrast (think WCAG 4.5:1 or higher) is the single biggest predictor of reliable scans.
How big should I make a QR code for print or screens?
For print, treat about 2 cm × 2 cm as a practical minimum, and use scan distance ÷ 10 for anything scanned from further away (a code scanned from 3 m needs about 30 cm). For screens, avoid going under about 200×200 pixels.
What is the quiet zone, and why can’t I crop it away?
The quiet zone is the empty margin around the code, four modules of clear space on every side, in the background color. Scanners use it to find the code edges. Cropping tightly, stacking text against the code, or busy backgrounds all eat that margin and make detection unreliable.
Can I change the shape of the three corner squares?
Yes, within limits. The three corner squares are finder patterns, and scanners look for their square-in-square structure. Rounded or dotted eyes usually scan well. Do not cover them with a logo, merge them with other modules, or remove the light ring between the outer and inner square.
How large can my logo be inside a QR code?
Error correction level H can recover about 30% of the data, but that is a limit, not a goal. Keep a centered logo at about 20–25% of the area, add a clear border, and retest. Pretty QR switches to level H automatically when you add a logo.
Which error correction level should I use?
Level M (about 15% recovery) is a good default for plain codes. Use level H (about 30%) when you add a logo, use a custom shape, or print on surfaces that can get scratched or dirty. Higher levels add more modules, so the code needs a little more space.
How should I test a QR code before I commit to a big print run?
Use multiple phones (new and old), the built-in camera and a few scanner apps, and several lighting conditions. If printing, test the actual printed piece; inks and paper change contrast. Slow scans, multiple attempts, or weird angles mean your design still needs work.
Related articles

Cute QR Codes: 20 Aesthetic Examples That Still Scan
Twenty cute, aesthetic, and fancy QR code examples, from heart and circle shapes to soft rounded and dotted styles, each tested with a QR decoder. Plus how to make your own for free.

How to Add Your Logo to a QR Code (Step-by-Step)
Upload your brand mark in Pretty QR’s Logo tab: file limits, size and margin sliders, hide-background-dots, testing, and export as PNG, JPG, or SVG, without breaking scans.

QR Code Colors: Can a QR Code Be Any Color? (15 Palettes That Scan)
Yes, QR codes work in color. Which colors scan and which fail (with measured contrast ratios), the 4.5:1 rule, colored QR codes in print, and fifteen tested color palettes with hex codes.